guides
Last update:22 August 2017
Starting Position Gather your forces and head south until you meet up with Kerrigan.
Kerrigan Kerrigan is a Ghost and has several special skills.
You’ll learn her weak and strong points on the way to the base.
Turret nest Here Kerrigan will explain how the detectors work.
In this mission, Kerrigan needs to watch out for Missile Turrets.
They may not attack her, but they will reveal her position.
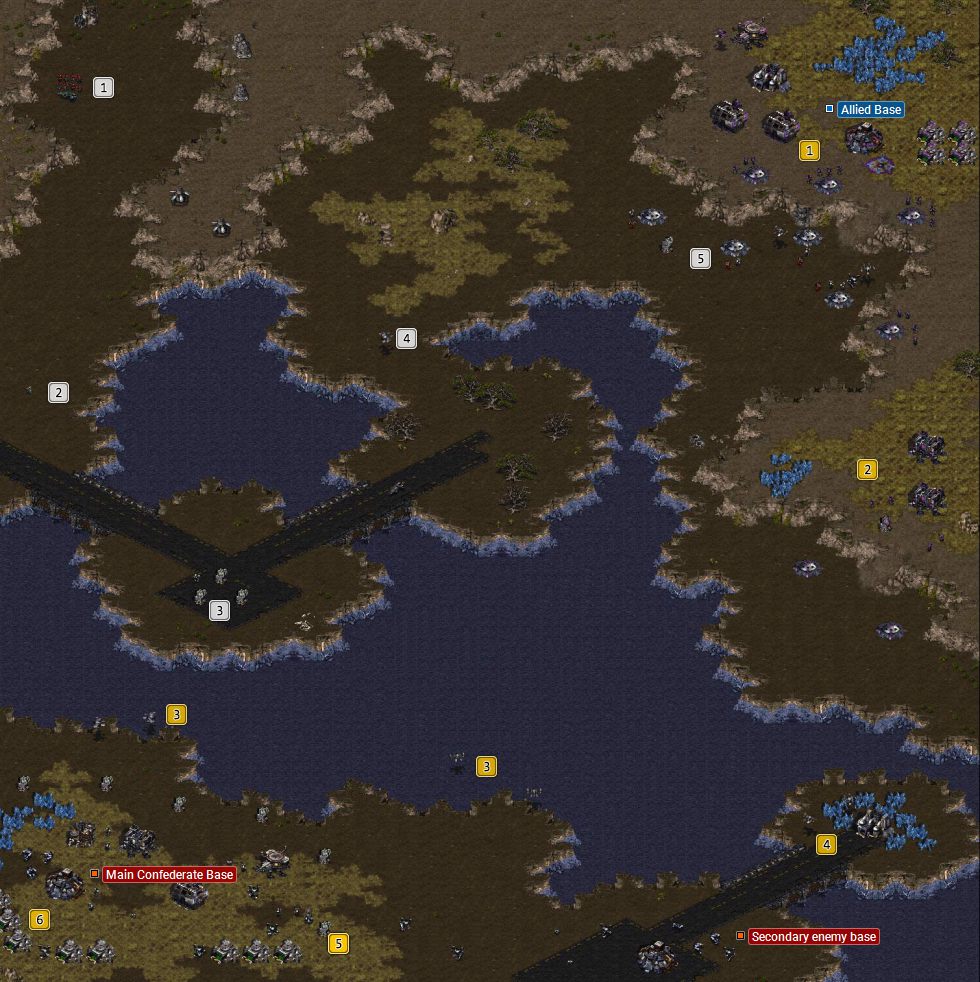
Lone Wraith fighter This solitary enemy is the perfect target for testing your Lockdown skill.
This will enable you to quickly destroy it without any losses.
Confederate defense line The spot hosts several bunkers and a group of enemies.
The Confederates will often land their forces below this point.
Barracks and place for additional buildings This hill is a good spot to build additional production structures.
Build turrets around this locations and man the bunkers on the south.
Make this place your training center.
Enemy fighters #1 Enemy Wraith fighters are deployed in several points on the coast of southern island.
To land your troops safely, launch your own fighters and begin luring the enemy Wariths.
Once you’ve cleared the coast, send your planes back to base.
Enemy fighters #2 Enemy Wraith fighters are deployed in several points on the coast of southern island.
To land your troops safely, launch your own fighters and begin luring the enemy Wariths.

Once you’ve cleared the coast, send your planes back to base.
Landing zone Gather your fighters in this spot and begin dropping infantry on the bridge.
You won’t take any casualties in the transport ships.
Destroy the enemy HQ and bring in reinforcements.
Have the infantry hold this position and send camouflaged fighters inside enemy base.
Attack positon for the fighters From here the camouflaged Wraith fighters can easily destroy the enemy HQ and SCV.
Proceed to destroy the rest of the buildings together with your infantry.
Mission objectives:
The inhabitants of Antiga want to join the newly formed rebel movement.
The Confederates are aware of this, however, and they sent their troops to prevent an uprising.
The second requires us to assume command of the base and destroy the Confederate forces.
You start in the top left corner.
Send the Marines and Raynor down the map until you meetKerrigan, a Ghost spec ops troop.
However, units and buildings that have the Detector ability can spot Ghosts.
The game will explain this further when you see 3 enemy turrets.
In this way, you’ll immobilize the enemy and prevent it from attacking.

Use this moment to eliminate it.
The Confederates set up their own bunker line at the rebel base.
You cantake Kerrigan to the headquarters in to two ways.
The first: by slowly destroying the Bunkers one by one.
After a short cut scene, the rebels join you and start to fire.
Lead Raynor’s squad at the same time and reset the place out.
Use all minerals to create workers and start mass crystal mining.
Have at least one or two Marines in every Bunker.
You will only fight the terrans so don’t produce Firebats.
It has a laser for land units and powerful antiaircraft rockets.
What’s important, having developed an adequate technology, it can become invisible like Kerrigan and Ghosts.
The second vessel is a simple transporter that can accommodate up to 8 footmen or 4 Vultures or Firebats.
Deploy infantry to the Bunkers at the bottom of the base and in its middle part.
If you begin to expand your base in these regions, they’ll change the landing zone.
Your base is located in a good spot so it’s a good idea to simply fortify it.
You have enough resources available.
you’re free to also build several Vultures.
Then, develop the Spider Mine technology and deploy them near the landing zone.
The enemy has two bases.
There, you’re able to also find all production buildings of the enemy.
You will need a large group of land forces to eliminate it.
To do it painlessly, you’re gonna wanna do a couple of things.
The last listed item lets you scan any point on the map.
Having unlocked the Cloak ability, send your fighters to destroy enemy airforce.
have a go at stay at a distance from the bank because Turrets are armed with rapid-firing guns.
Start from the right corner of the map and activate invisibility.
Fly up to the enemy fighters as closely as possible and attack them.
A single shot from the entire squad will immediately destroy a hostile fighter/transporter.
Now, start attacking the Goliaths and, at the same time, bring your transporters with infantry.
Deploy your footmen at the enemy Refinery and start clearing out this part of the map.
Send back your transporters for reinforcements, if needed.
The time has come to attack the main base of the enemy.
The infantry should focus on destroying production buildings - first Startport, then Factory, and lastly Barracks.
Now, eliminate the remainder of enemy structures, turrets, and units.
Once done, the mission is over.
This site is not associated with and/or endorsed by the Blizzard Entertainment or Blizzard Entertainment.
All logos and images are copyrighted by their respective owners.
