guides
Last update:01 February 2018
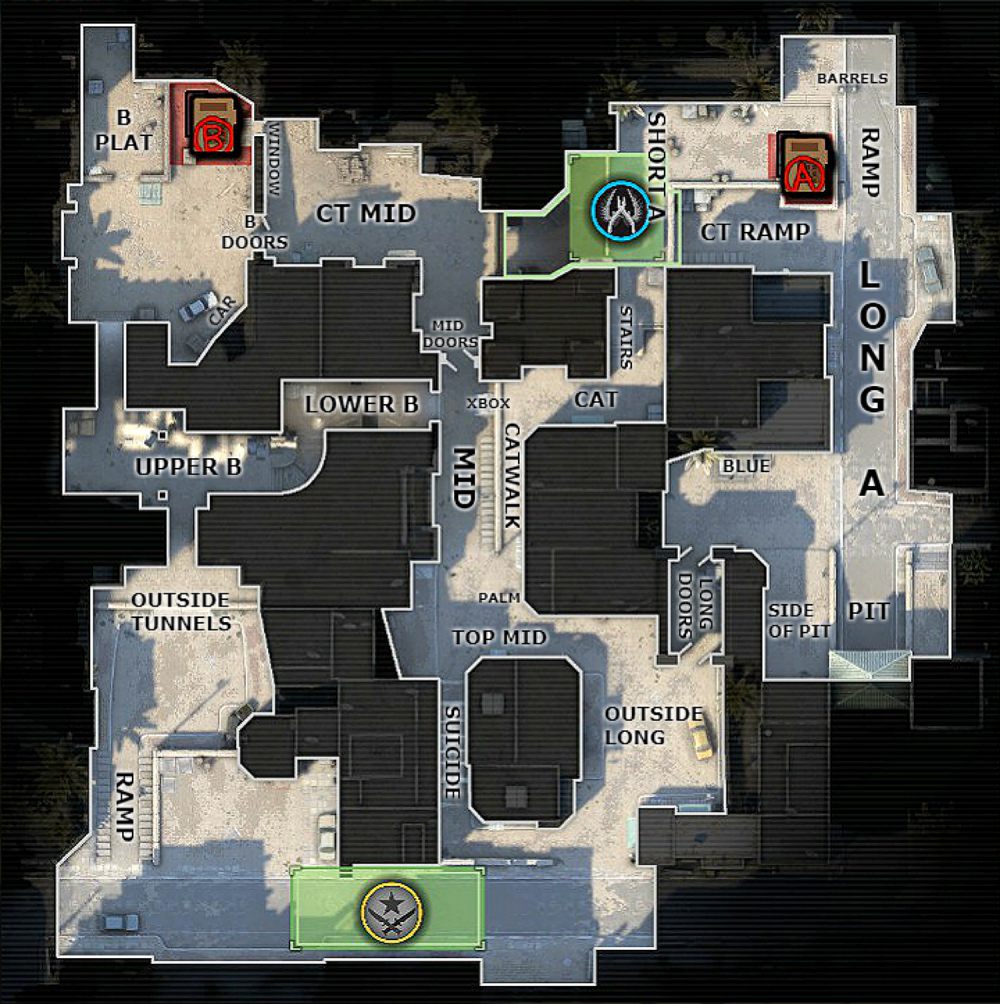
Dust 2is a map used in Bomb Defusal mode.
From the very beginning,Dusthas been the most popular map in every of theCounter-Strikegames.
There are two locations where you’re able to plant bombs.
Dust II is a preferable map for Capture the Flag rather than Control Point mode.
Smoke grenades
The following list presents recommended smoke grenade throws that can be very useful during gameplay.
The screenshot presents the result of your throw.
This gives you a very effective cover against all the enemies waiting behind the corner.
Here is a second variation of the previous throw.
Place yourself in the corner, between two crates and aim at the marked spot.

Perform a long throw by pressingLMB.
The smoke screen should cover the corner where one of your opponents is likely to hide.
Just place yourself in the corner of the building and aim at the marked spot.

All you better do is pressLMBand toss your grenade.
This will protect you from attacks from the right side.
Aim at the marked spot,hold down LMB,go forward and release the button.

Place yourself right next to the wall and aim at the marked spot.
Now perform a sneaky throw bypressing LMB while moving forward.
This way you should be able to cover the so-called X-Box without risking getting hit.
It’s not the easiest throw but you should be able to master the trick after a couple attempts.
Stand in the corner, between the wall and the crate, and aim at the marked spot.
PressLMBto throw your grenade.
If you managed to do it right, the grenade will explode exactly in front of the Counter-Terrorist tunnel.
The smoke screen will greatly limit your opponent’s field of view.
Aim at the marked spot, pressLMBand throw the smoke grenade after moving forward.
The grenade lands further into the Counter-Terrorist tunnel and limits field of view of all the enemies.
you’re free to perform another interesting throw when you are on your way to bombsite A.
Stand against the wall, next to the crate, and aim at the marked spot.
Now pressLMBto throw your grenade.
This will create a smoke screen inside the Counter-Terrorist tunnel and hide you from enemies on the other side.
Stand on the roof of the car, on its right side, and aim at the marked spot.
UseLMBto throw your smoke grenade.
Stand in the Counter-Terrorist tunnel, aim at the crates and throw your grenade (LMB) while moving.
You don’t have to be too accurate when it comes to the red dot marked in the picture.
you’re able to aim slightly above or below it.
Before you enter bombsite B, you might throw a grenade into the tunnel from the Terrorist side.
Turn your back towards the wall, aim at the marked spot and pressLMBto throw the grenade.
This protects you from players who are waiting in the tunnel.
It’s a very popular place among players using sniper rifles.
This creates a smoke screen for all players who are coming from the Terrorist side.
They won’t be able to tell how many people are defending bombsite A.
Stand on the crates, right next to the wall and aim at the marked spot.
Hold downLMB,jump and throw your grenade.
The created smoke screen will protect you from players attacking from the Terrorist Spawn Zone.
Furthermore, it will limit field of view of all the enemies looking through the doors.
Flashbang grenades
The following list describes recommended flashbang throws that can be very useful during gameplay.
Stand in the corner of the tunnel that connects two fighting sides and aim at the marked spot.
Nowjump upand pressLMBto throw your grenade.
Furthermore, allies waiting at the doors will not be affected by the blast.
This means that they can strike right away.
Aim at the marked spot and useLMBto throw your flashbang.
Allies waiting at the doors will not be affected by the blast.
Before you enter bombsite B, you’re free to throw a flashbang and blind any potential opponents.
Use the wall presented in the screenshot.
Don’t worry too much about the red dot - you could aim slightly up or down.
Here is another wall that you could use to throw a flashbang into bombsite B. it’s crucial that you be fast and perform yourLMB throw while moving.
venture to aim between the two pipes of the billboard and use LMB to throw your grenade.
The grenade will bounce off of the sign and blind all the nearby players.
Throw another flashbang entering the long passage that leads to bombsite A.
Examine the picture to adjust your position and aim.
HitLMBto throw your grenade.
The grenade will explode behind your back, right around the corner.
All the enemies facing that direction will be affected by the blast.
Use the ramp near bombsite A to perform a short and useful throw.
Stand right by the wall and aim at the marked spot.
Now useRMBto throw your grenade.
The grenade explodes at the top of the crate - its blast will blind all the nearby opponents.
Aim at the marked spot while running and useLMBto throw your flashbang.
The grenade explodes right around the corner and the blast will blind all the players facing that direction.
They will have no time to react.
Just remember that it’s crucial that you look away while running.
Otherwise, you may blind yourself.
UseLMBto throw your flashbang.
The grenade should bounce to the right and blind all the players located by the tunnel’s entrance.
Furthermore, the blast should also affect enemies hiding behind the container on the right side.
The grenade bounces off of the wall and explodes above the ground.
All the players in the surrounding area will be affected by the blast.
It’s a very clever move because opponents equipped with sniper rifles will be waiting on the Counter-Terrorist side.
Move forward - the grenade explodes behind your back and disorients your opponents.
Let the ally straighten up and jump.
You will have a clear view of enemies coming from the tunnel.
Then, you have to jump on his shoulders.
You have a clear view of enemies moving towards bombsite A.
Jump again so that your companion can straighten up.
If your companion moves a little higher you will be able to jump on his shoulders once again.
This will grant you an even better view - you might now look deeper into the tunnel.
Enter the lower tunnel on the Terrorist side to perform another trick.
Tell your ally move to the marked spot and jump on their shoulders.
You will have a clear view of enemies coming from bombsite A.
Ask your companion to stand in the marked location and carefully jump on their shoulders.
Zoom in to locate the enemy on the other side of the map.
The good thing is that a player won’t be able to see you.
Places where you could set an ambush or expect one.
Approach the crates from the marked side and order your character to move right while climbing the obstacle.
Your character goes up and you will be able to spot an enemy.
The great thing is that you will remain hidden.
This place is always protected by one member of the Counter-Terrorist squad.
The presented tunnel is one of few places that can be used by Terrorists to reach the bombsites.
The doors in the picture are another example of a passage that you should protect.
However, watch out for players usingAWP, as they can spot you through the narrow gap.
When that happens, they will fire immediately without hesitation.
for move safely through this part of the map you should jump while running or use a smoke grenade.
This is the third entrance that can be used by Terrorists to reach a bombsite.
They will often use smoke grenades or flashbangs, so don’t stand too close to the entrance.
Hide behind this wall and you will have a good spot to work from.
When that happens, alert your teammates immediately and prepare some grenades.
It’s highly possible that you will come across players withAWPhere.
Let’s move to bombsite B.
You are safe behind the obstacles and you might see the tunnel through the narrow gap between the crates.
If anyone comes from that direction, you will be the first one to know.
This is a very popular spot among Counter-Terrorists defending bombsite B.
Here, you’ve got the option to come across players with rifles and sniper rifles.
If you crouch behind the barrels, you should be partially covered from enemy fire.
Stand up to fire back and take cover by crouching again.
Yet another popular place among Counter-Terrorists.
Incoming enemies won’t notice you if you hide behind the car and crouch.
If you stand up fast enough and fire, you could catch your opponents by surprise.
The main drawback is that Terrorists will often throw HE grenades and Molotov Cocktails in your direction.
A smoke screen in the entrance can provide you an additional cover.
The Terrorist Spawn Zone is the favorite location of all the players usingAWP.
A good solution is to aim slightly at the door and fire right after you spot an enemy.
This is possible becauseAWPbullets have great penetration power and can easily eliminate players located behind similar obstacles.
It’s highly possible that one of the Counter-Terrorists is defending this path.
You should also check the stairs leading down immediately.
They are located on the right side.
If you have yourAWP, it’s possible for you to blind fire through a smoke screen.
This is another highly occupied position so you may want to check it before entering bombsite B.
Just like in the case of the previous position, you are more than welcome to blind fire.
An enemy may be hiding there.
Once you exit the tunnel, you should immediately verify if there are any enemies hiding behind the car.
The same goes for the crates on your right.
Enter the lower tunnel to take a good position.
Another well-protected and often occupied position is right in front of the doors leading to bombsite B.
Crates provide great cover and you will have clear view of the long passage.
This is the long passage leading to bombsite A, seen from the perspective of a Terrorist.
Opponents will frequently hide around the corner, especially at the beginning of a round.
You should also pay attention to the container on the left and lower terrains on the right.
Pay attention to the car in the distance while you are heading towards bombsite A.
You won’t be able to spot enemies if they are crouching behind the vehicle.
Pay attention to all the barrels and crates in the distance when you are moving towards bombsite A.
Sometimes, it’s hard to define whether an opponent is hiding there.
It’s possible that an enemy can hide in the distance, usually behind the wall.
Pay attention to the scattered crates that are further into bombsite A.
This site is not associated with and/or endorsed by the Valve Corporation or Valve Software.
All logos and images are copyrighted by their respective owners.